

If you're looking to create beautiful, long-lasting and stunning outdoor patio, walkway or driveway, it'sn't only about the aesthetics of the pavers that you select It's the foundation underneath them that's the most important thing. The base, also known as the foundation layer determines the quality, durability and the stability of your whole construction. In the absence of proper preparation and concave even the highest-end pavers can shift, break or sink with time.
The secret of flawless pavers is in one crucial element -the well-sealed foundation of crushed stone. If you're a home owner undertaking a DIY task or a professional who is able to deliver top quality outcomes, knowing the best way to prep and compress the proper base layer is essential to successful results.
Why the Base Layer Matters
Consider your base as being the base of your paver installation. It is a solid base that can support the weight of pavers, as well as the weight above (such as pedestrians or cars) as well as ensuring proper drainage. With no firm base that is solid, the top layer of the pavers can be prone to settle in a way that is uneven, causing unsightly gaps, cracks as well as instability.
The rightly compacted base for a crushed stone paver provides numerous benefits, including:
-
Protects against shifting by keeping pavers firmly in place, even when under the pressure of heavy usage.
-
Enhances drainage: allows the water to move through instead of accumulation, thus reducing erosion as well as freezing.
-
Improves longevity: Reducing the wear and tear of your paver, which extends the longevity of your paver construction.
-
Makes a Smooth Surface It makes installing easier and aids in maintaining level align.
Choosing the Right Base Material
The most suitable foundation material for paver installation is crushed stone and not gravel, sand or dirt. Although they may appear identical however, crushed stone is much more an angular stone that is more interlocking once it is compacted. It creates an even stronger base.
A base of paver stone that has been crushed usually consists of crushed rock fragments that range from small dust, to smaller stones that are around 3/8-inch in diameter. The sharp edges assist in locking the pieces together after they have been the stone is compacted, creating a strong and solid base.
If you're looking online to find "crushed granite near me," you're in the right direction. Crushed granite is among the most sought-after and efficient material for paver bases because of its exceptional compaction capabilities and its natural ability to drain. Additionally, it's attractive that makes it an excellent choice for landscaping that is visible.
Most popular kinds of crushed stone utilized for base paver stones include:
-
The Class 2 road base Blend of crushed rock as well as fines which provide outstanding compaction.
-
Crushed Granite is durable Weather-proof and weather-resistant. It is ideal for areas with high traffic.
-
Limestone Base: Typically employed for its strength as well as affordable.
-
Recycling Concrete Base A ecological and economical option that is constructed from recycled concrete.
Step-by-Step Guide to Preparing the Perfect Base
Step 1: Plan and Mark the Area
Before you begin digging, plan your layout carefully. Make use of stakes and string to define the limits of the project. Examine the drainage slopes, and make sure your pavers sit just a little higher than the ground so that water can flow away.
Step 2: Excavate the Site
Find the hole in the appropriate depth depending on the type of construction you're planning to install:
-
Pavements and patios: 4-6 inches of ground material.
-
Roadways and areas with heavy use with 8-12 inches of base material.
Be sure to consider the paver's thickness (typically 3 inches) as well as a sandy layer over it (about one inch).
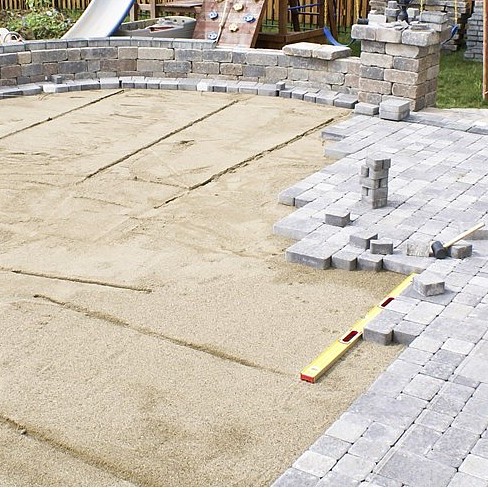
Step 3: Level the Subgrade
After excavating, make sure the ground beneath is firm and level. Take away any debris, roots or weak spots. If you have loose or clay soil compact it using an auxiliary compactor plate to stop the soil from settling further. Additionally, you can put a layer on top of a geotextile fabric that separates soil from base material. This will prevent mixing of the materials as well as improving drainage.
Step 4: Add the Crushed Stone Paver Base
The next element -- filling with crushed stone paver base. Distribute the base evenly over groups of approximately 2 inches. Don't try to dump and compress all the material in one go; layering will ensure that each piece of material is compacted correctly.
If you're searching for high-quality material, searching "crushed granite near me" will connect you to local vendors that provide large-scale delivery. Local buying helps cut down cost and also ensures that you will receive quality material that is fresh and properly graded appropriate to your soil and climate conditions.
Step 5: Compact the Base Layer
The true strength is derived from. Utilize a plate compactor (available in many hardware shops) to compress the layers of foundation substance. The vibrating action locks the stones to eliminate air pockets, making a solid, sturdy foundation.
Effective tips for compaction
-
The crushed stone should be drenched by water prior to compactingThis helps to bind the stone particles.
-
Condense each layer of 2-3 inches in a separate manner for the best results.
-
Check the level of firmness by walking across the surface and your feet won't leave any marks that are noticeable.
Following the last layer is laid, check the slope for proper drainage. Typically one inch of drop every 4-8 feet to the side of structures is the best option.
Step 6: Add a Sand Layer
After settling the crushed paver's base stone, apply an inch layer of sand concrete or paver smoothing sand. It provides a level surface for the pavers to sit on, and also allows for small modifications during construction. Make use of screed rails or straight boards to make it level.
Be careful not to use excessive amounts of sand as the excessive amount of sand can cause shifts or uneven surfaces in the future.
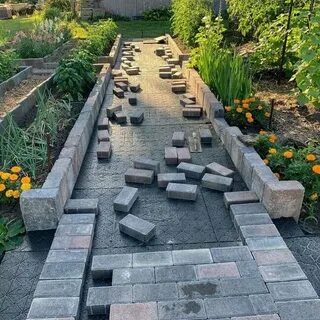
Step 7: Lay and Compact the Pavers
Lay your pavers in the pattern you want, while maintaining the same space between the pavers. When all the pavers have been set, make use of the compactor once more (with the rubber pad attachment) to compact them into their sand layers. Then, they will be able to lock to the base underneath.
Then, you can sweep the either fine or polymeric jointing sand through the cracks between pavers, and then spray lightly with water to help activate the adhesive agents.
Common Mistakes to Avoid
Even experts can fail when they are preparing paver bases. These are the most common mistakes to be aware of:
-
Inadequate compaction can cause the surface sinking or becoming uneven.
-
Don't use the incorrect material Beware of pea gravel and stones that aren't crushed -- they aren't able to compact.
-
Incorrect drainage slopes can cause erosion and water pooling.
-
Overusing sand: Makes pavers unstable over time.
If you take the time to prep and cement your paver base properly and correctly, you'll be able to avoid cost-intensive repairs down the line.
Why Crushed Granite is a Smart Choice
When you look up "crushed granite near me," you'll see it's one of the top materials for paver base materials with the right reason. Granite that has been crushed is very durable and naturally impervious to weathering and also provides great drainage. The angular shape locks tightly in place under compression, providing more stability compared to round gravels.
In addition, its simple, natural appearance can be used for base materials that are visible and for hidden structural layers. Also, it's widely accessible across California and the other states of western America which makes it an ideal alternative for contractors as well as homeowners.
The Bottom Line: Build It From the Start
The beauty of a paver's surface begins with the foundation. With a properly compacted paver base made of stone and using top-quality products like crushed granite, you'll set the foundation for a durable beautiful, professional appearance. If it's a patio the driveway or walkway the amount of effort put into creating the base will decide the quality of your work. to the tests of time.
If you're eager to get started on the next project with pavers get your supplies from reputable local vendors. Looking on the internet for "crushed granite near me" or calling a reliable company such as Western Materials ensures you get top-quality, reliable aggregates that are delivered right to your place of business. When you have the proper base, your pavers will not just look great -they'll last for a long time to come.